When Inspiration Just Won’t Show Itself…
I have found that when inspiration won't come, you just have to wait.
I have deadlines for a couple of challenges coming up next month. I've had some threads of ideas come to mind but nothing that I could get excited about. Recently my concentration has been focussed on a larger landscape quilt that really has no deadline, just an idea that I needed to do. A special place that I visit all the time when I'm out walking my dog. I realised that to be inspired for the other projects I needed to clear off my cutting table, hang up the work I have already started, put the threads away, and wait…
Thankfully I didn't have to wait long. Inspiration came in the form of an article by Sue Bleiweiss in the latest Quilting Arts magazine. I've recently considered the idea of working in a series and Sue made it sound so easy. I followed her tips on using a mind map quiltingdaily.com/mindmap. Then the ideas started to flow.

I now have a plan for both challenges – I just need to meet the deadlines. I will attempt to document my process without revealing too much of each quilt as I want to keep them both under wraps until they are officially revealed for the challenges.
Watch this space…
Give It A Go Day 2017
Saturday 29th July was Hawke's Bay Patchworkers and Quilter's 2nd Give It A Go Day. This year I was able to participate as a student rather than a tutor.
My morning workshop was Strip Pieced Magic with Neddie Clark, based on an idea in a book by Ricky Timms called Convergence Quilts.
We were required to bring 4 16" squares of different fabrics. I decided to take a selection of my hand painted fabrics. With Neddie's help we decided on four that looked good together and here is the result:
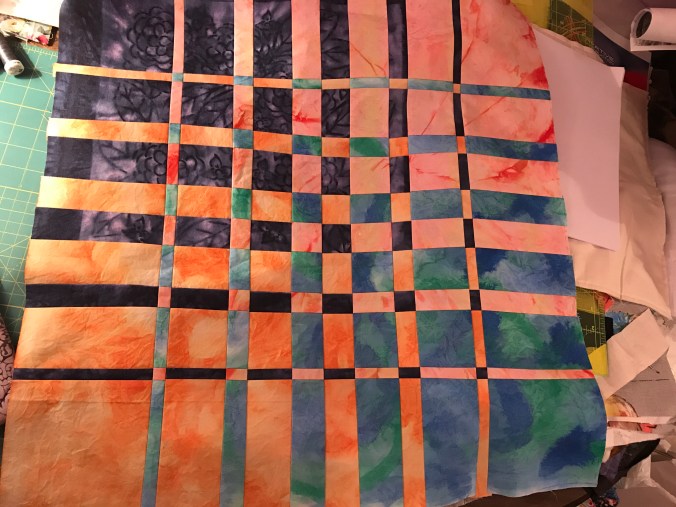
The workshop highlighted the need to be systematic, organised and precise. I was rather pleased with the result.
At 12 o'clock lunch was announced so we packed up and moved to the next station in preparation for the afternoon session. Some of our members volunteered to prepare a soup and bun lunch which was just what we needed.
My afternoon workshop was McTavishing Style Free Motion Quilting with Ann Yeo, using ideas from Karen McTavish's book, Mastering the Art of McTavishing.
I have done a bit of free motion quilting but it's always good to try something new. I have been impressed with Ann's wonderful quilts and wanted to learn her secret.
We started right back at the beginning with paper and pen to practice the shapes and create what Karen calls 'muscle memory'. I found the practice on paper quite relaxing. It felt good to draw. It was quite mesmerising. Then came time with the machine. We used a free motion foot, threaded the eye on the bobbin case and loosened the top thread. I was impressed with how easy it was. Just three main shapes and I was away like I'd been doing it for years. I'm really looking forward to incorporating these new skills in my future quilts.

There were two other workshops running, a foundation piecing class working on a Christmas tree runner and another class learning a new way to make Cathedral Window blocks.
Another great day, enjoyed by all who attended.
A Busy Year
It’s hard to believe that it’s almost a year since my last post. Although I have been inactive here I have been busy in my studio.
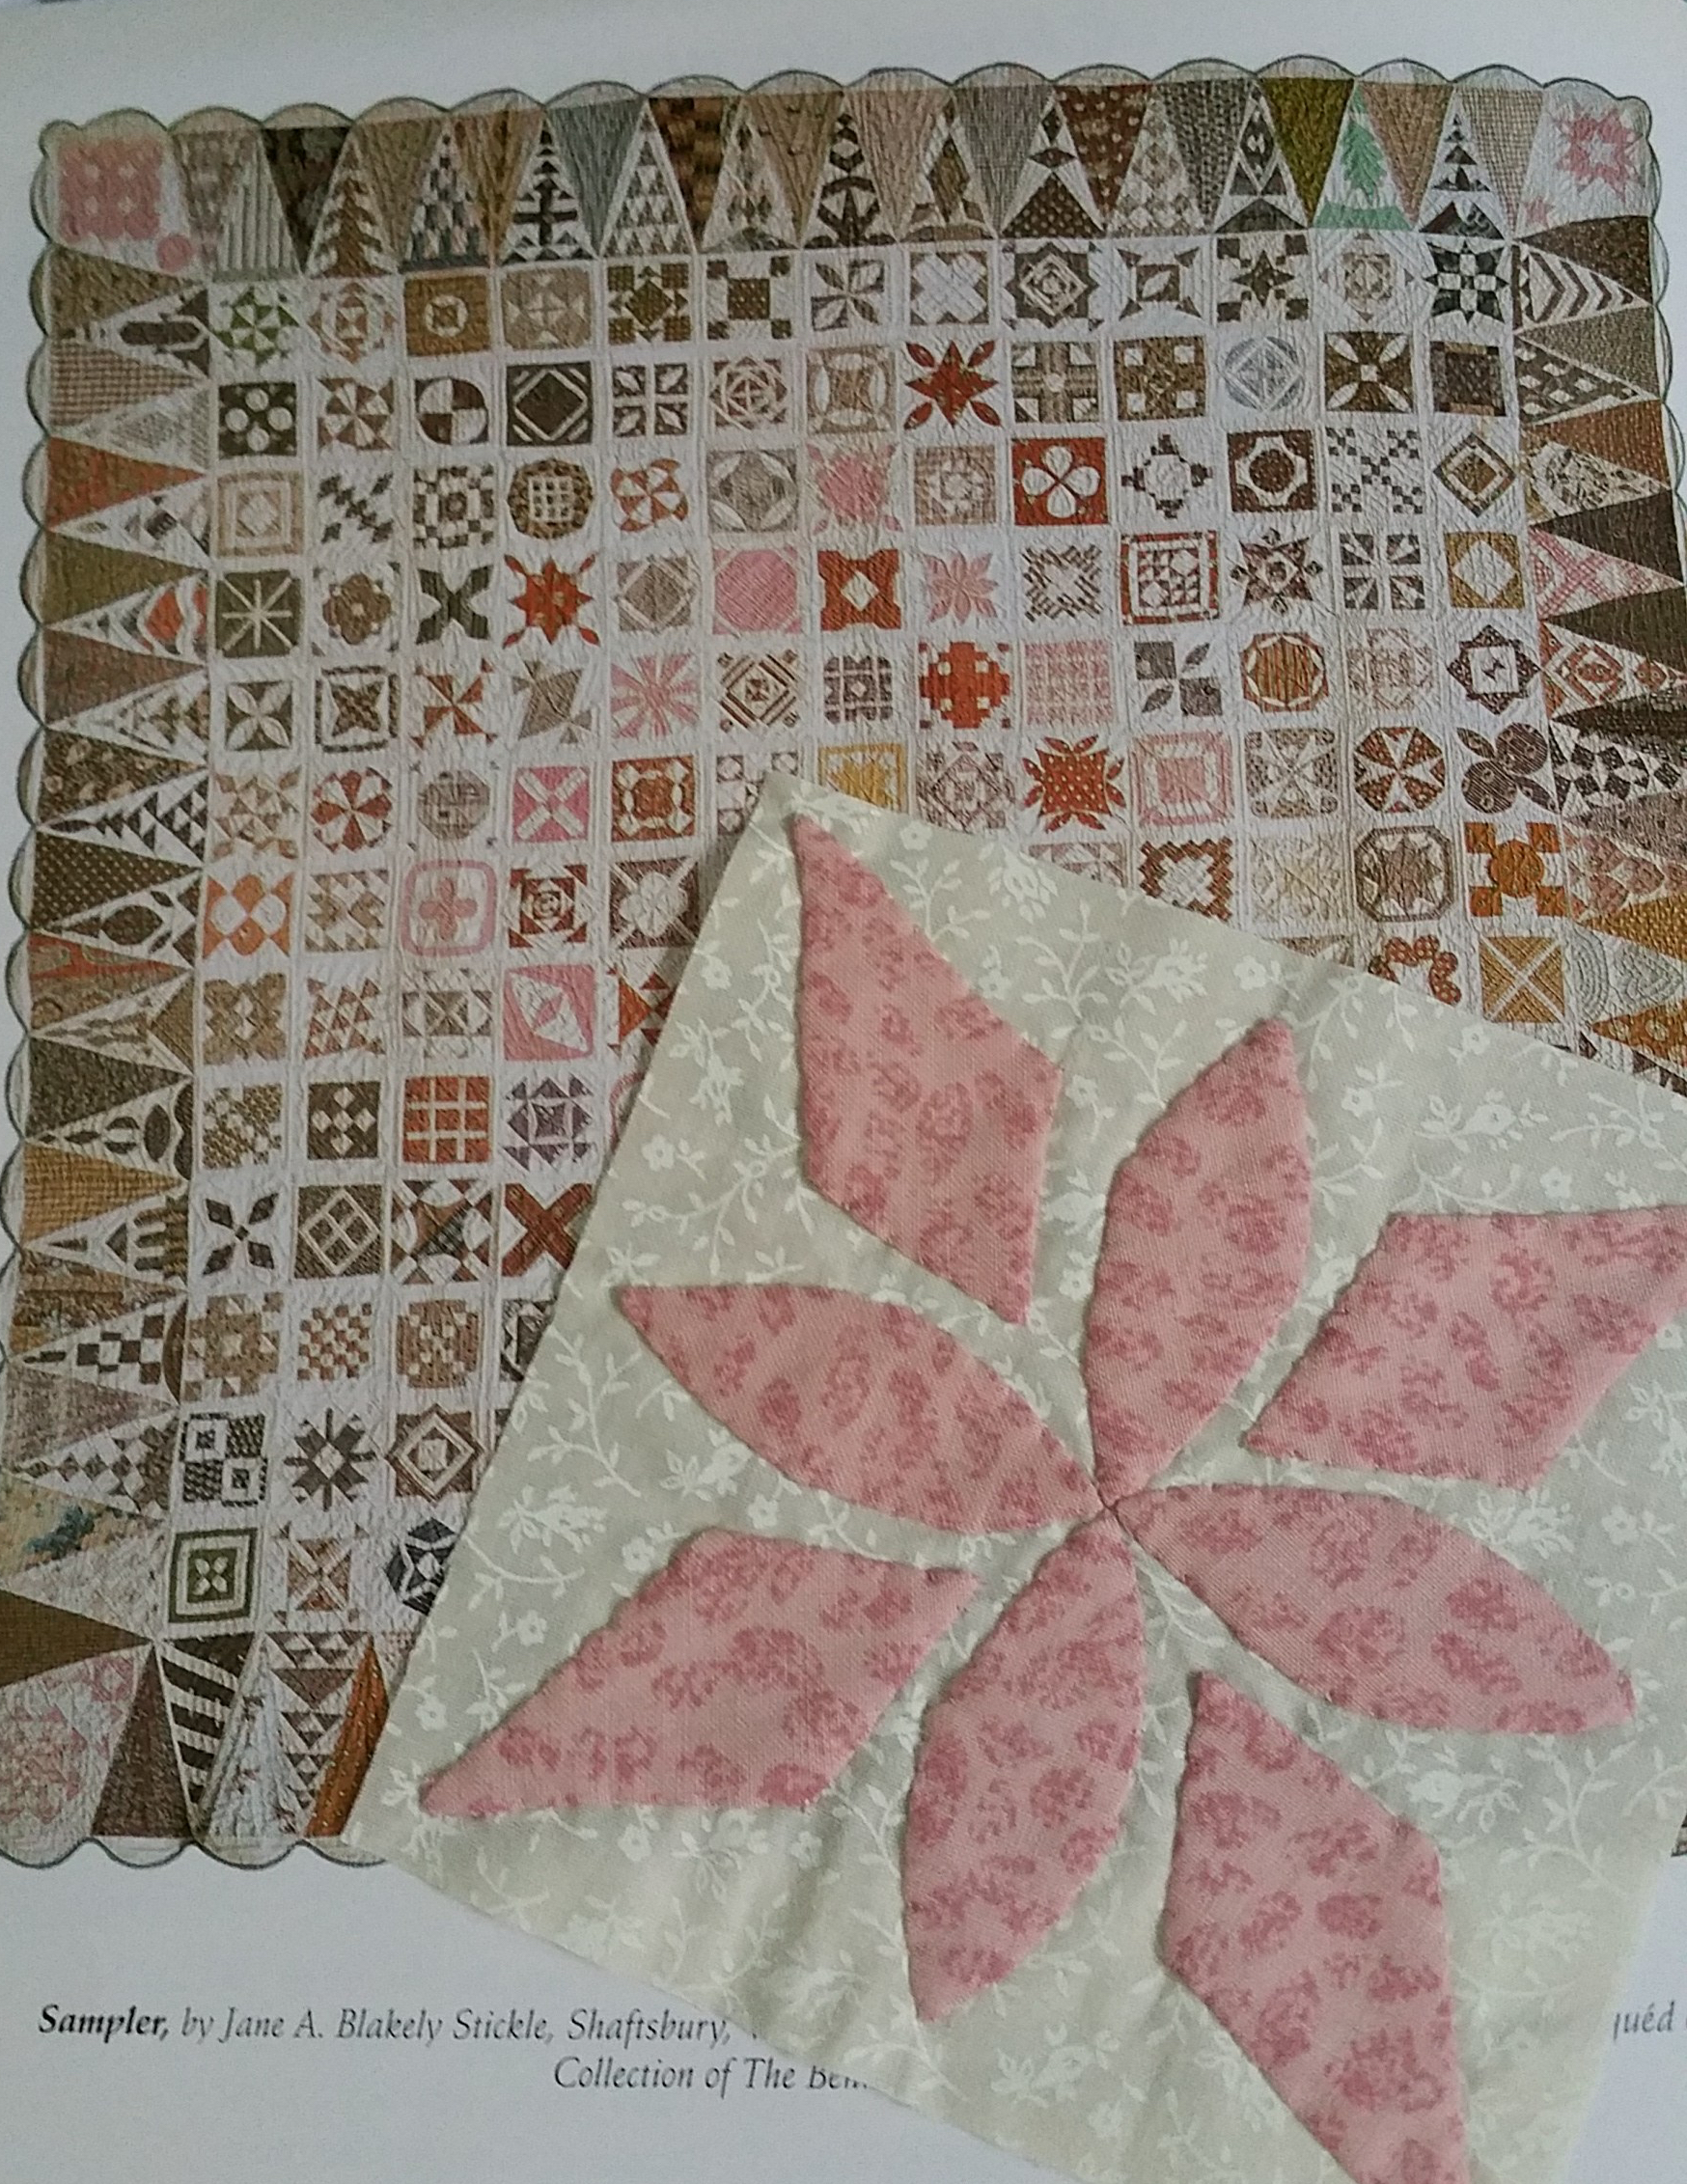
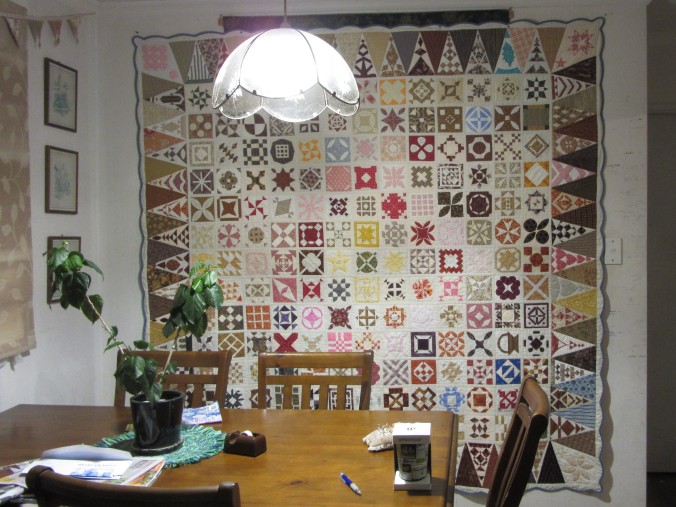
For more than two years I have been working on a replica of Jane Stickle’s 1863 sampler quilt, aptly named Dear Jane by Brenda Papadakis, who painstakingly drafted all the patterns for the many blocks that make up this amazing quilt. I found the software package that Brenda and The Electric Quilt Company co-produced so I thought I would take up the challenge. And what a challenge is was. I made my first block on the 5th of October 2014 and completed the last one on 1st of December 2016.
I started the task with gusto but after a while the size of the project became a little overwhelming and my enthusiasm waned. Other projects presented themselves and my Dear Jane block making slowed to a stop.
Then I was introduced to Emma Rogan’s 100 Days Project – doing something creative every day for 100 days. Www.100daysproject.co.nz choose 2016 then search using ‘Dear Jane’ to view my project. This was just what I needed to get my Dear Jane back on track. I had completed 69 of the centre blocks and there were 100 to go (purely coincidental). It was a no brainer, I had to do it.
There were days when it was easy to complete a block and post it online, then others when it was more difficult. Trips away needed to be well planned with materials and tools packed to complete my blocks in motel rooms or waiting while travelling. It became exciting and fun to complete the challenge within the challenge!
The centre blocks took anywhere from half an hour to 3 hours to make. Some are pieced by hand others by machine. All the appliqué was done by hand. The centre blocks are 4 1/2″ square finished.
Joining, sashing, positioning border triangles and kites, scalloped border, then sandwiching, quilting and binding took a further 5 months.
I learnt so much while completing this quilt. I realised early on that I needed to learn tradition skills rather than relying on my self taught techniques if I wanted to create a quilt that I could be proud of. I registered for Katrina Hadjimichael’s ‘Ashbourne Mill’ workshop at 2015 Symposium in Palmerston North to learn how to foundation piece. These skills proved invaluable for Dear Jane. The final scalloped border and the binding cut on the bias were also new skills to master.
My plan was to exhibit my Dear Jane in the 2017 Christchurch Quilt Symposium. Imagine my dismay when I read the conditions of entry:
The entry must be the maker’s own work including the design, piecing, quilting & binding.
I emailed the committee and the reply was “have you changed the block placement or made it your own in any way?” – that’s not what a replica is about. I wanted my quilt to be as near as it could be (using fabrics from my stash), to Jane’s original wonderful design. Their suggestion was to submit it anyway and let the judges decide.
I chose to keep my non refundable entry fee. Why would I exhibit my replica alongside original designs? I understand that the committee has the right to decide on the criteria for their exhibition categories, so with a pang of disappointment I chalked it up to experience. I will exhibit it in another show.
Please leave me a comment if you have had a similar experience or if you too have created your own Jane Stickle Quilt.
Thread Painting Workshop – ‘Give It A Go’ Day
Saturday 30th July arrived. Was I ready to deliver my very first workshop?
The car is packed – I think I have everything. Time will tell.
We had half an hour to set up the hall for the four workshops – Hand Applique; Free Motion Quilting; Make Your Own Fabric and Thread Painting.
Everyone received a pack with a colour photograph, written instructions and a postcard sized art quilt ready for embellishment. After a bit of explanation from me and some advice on setting tensions (which turned out to be the most challenging part of the exercise), the whole class set off to try thread painting.
It was important to practice on an interfaced scrap to get the tension correct before working on the postcard. Everyone came prepared with the right coloured threads and the results were amazing!


I’m really proud of the examples from my team and the show and tell from the other workshops speaks for itself. I hope some of my students will take up the challenge and make a 12″ x 12″quilt to bring to the next quilting together day.
Give It A Go Day was a huge success and I’m sure it will be repeated again next year with other members stepping up to share their expertise. Congratulations to the committee for organising such a great event.
‘Give It A Go’ Day
Hello!
My local quilt group, Hawke’s Bay Patchwork and Quilter’s, have asked me to help out with their up-coming ‘Give It A Go’ day. A fun day for members to try something new.
Free Motion Quilting, Needle Turn Applique, Making More Fabric are on offer and I have been asked to share my Thread Painting techniques. I thought my preparation for this day would make the ideal subject for my first blog post.
Thread Painting
Thread painting is the technique of using thread to add colour and texture to an art quilt. The quilt top can be raw edge appliqued as in this example or could be a whole cloth quilt with the design painted on with fabric paints prior to stitching. The outline is thread sketched and then various colours are auditioned to imitate the shading and highlights of the original photograph. Thread painting is completed before the top is sandwiched and quilted.
The Process:
- Source Photograph
Edit photo to position subject for the best effect. Save as – to ensure your original is not changed. Open Picture Sketch Camera – My Perfect Pics Effects 365 http://www.appsgalery.com/apps/picture-sketch-camera–my-perfect-pics-effects-365-277161. Once you have installed and opened the app on your PC click on photos – find your saved photo, open. Crop again if necessary, click on the tick when you are happy with the composition. Note you can adjust using the buttons along the bottom depending on how you want your finished image to look. Ie portrait, landscape, square, free size.
Next step: use the buttons along the bottom to view your image in different styles. This is where I choose a style that will make it easier to trace the shapes. Button 1 or 19 usually gives a good line drawing. I use button 2, 9 or 18 to distinguish the colour values. - Print Pattern
Go to blockposters.com. Follow the steps to posterise your image. Upload your image – find saved Pencil Sketch – open. Customise your poster. Change the settings to achieve the size and orientation you want. Tick the Ts & Cs box – then create my poster button. Download your poster button. Print and sellotape your poster together. - Pencil Tracing
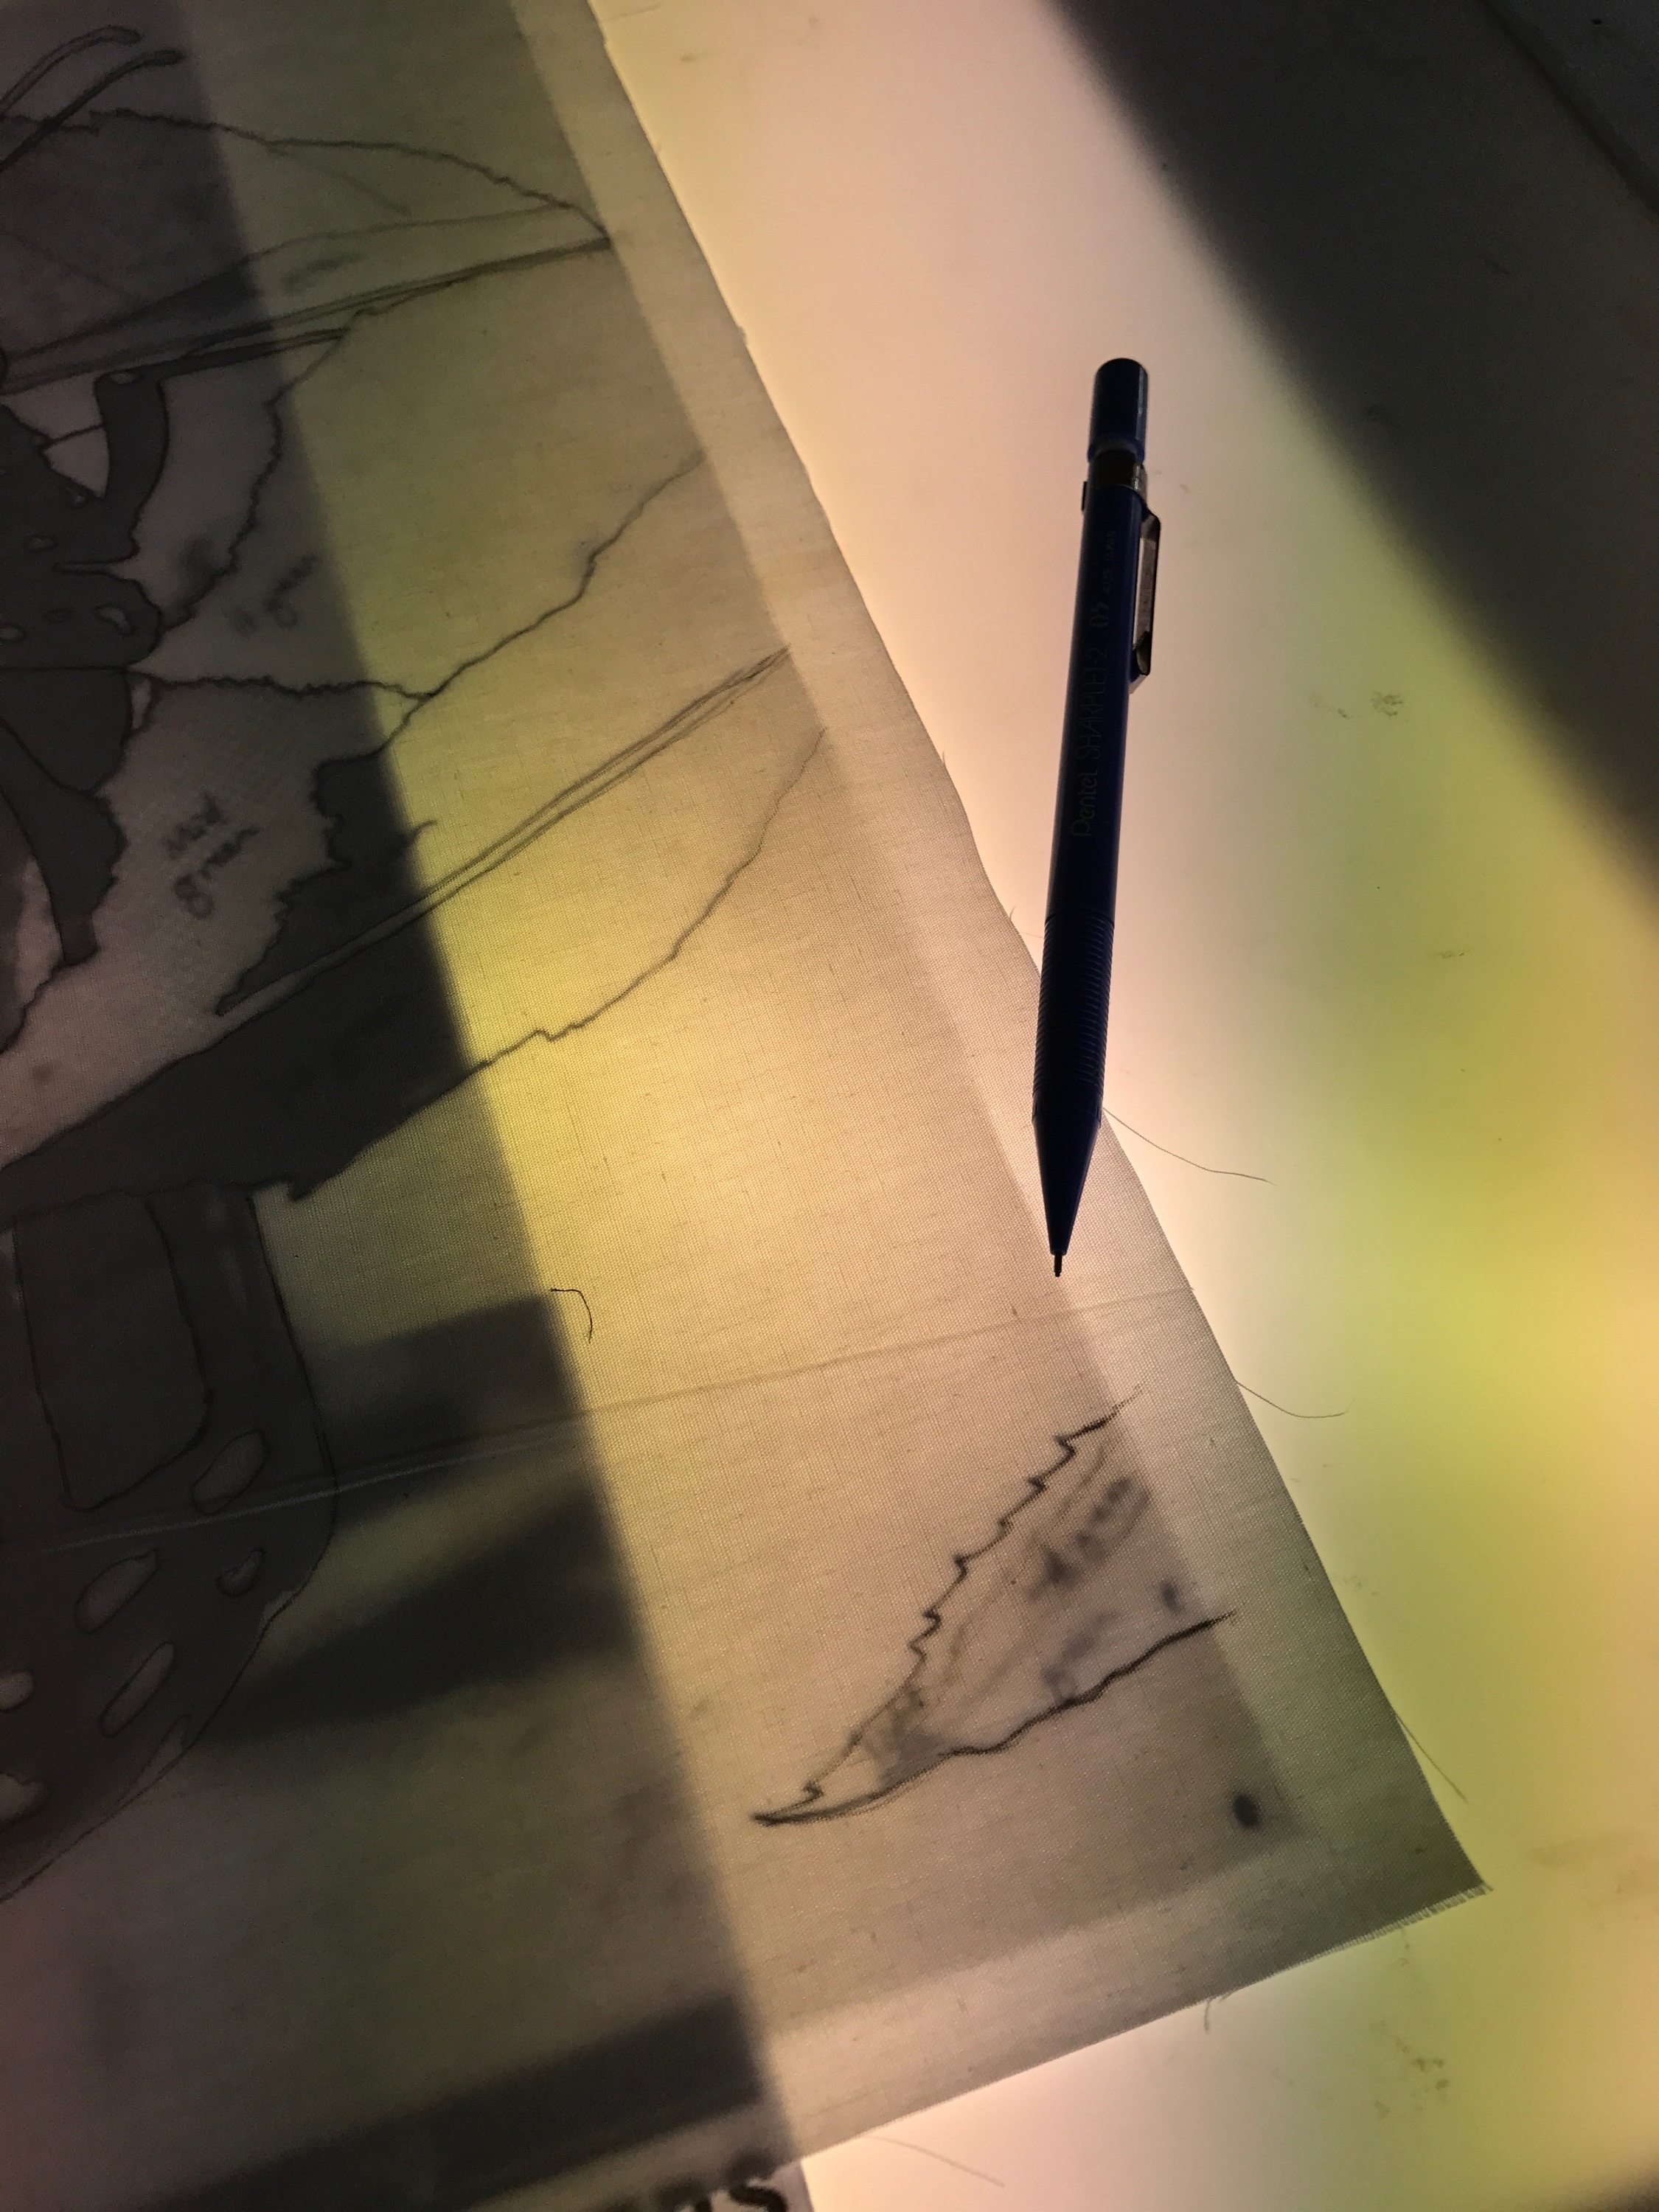
Using a lightbox tape your pattern down. Make a tracing of your quilt. This is where I decide which elements I will keep and which I will leave out. Often there is too much going on in the background. These elements can be left out so that your main subject is the hero of the quilt. Make a cellophane tracing from your pencil tracing using a sharpie pen. This will be used to make sure your fabrics are in the correct position. - Prepare Fusible Webbing
Turn the cellophane over and mask to the lightbox. Trace the required shapes onto the paper side of fusible webbing allowing extra on edges that will go below another piece. Cut out the shapes with 1/8” around each. - Prepare Shapes
Iron fusible webbing to the back of fabric. Cut out shapes on the line. Mark the petal lines on your flower with a soft pencil using the light box. Mark pencil lines on leaves.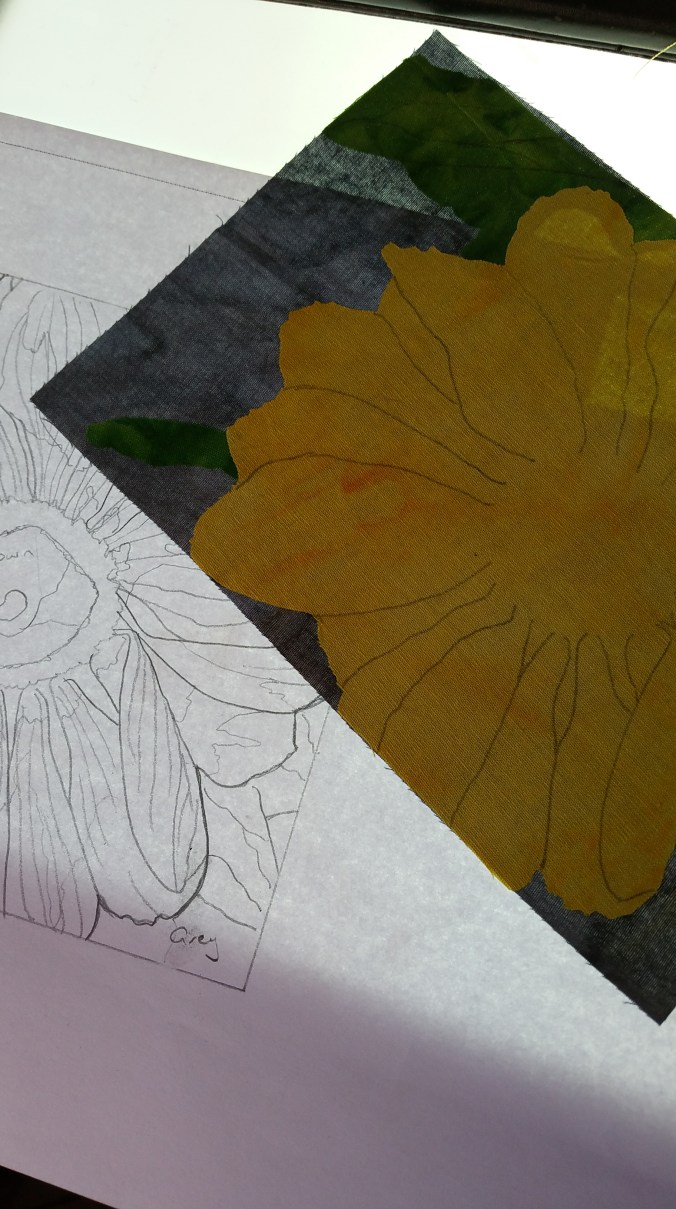
- Prepare the Quilt Top
Cut the background piece slightly larger than your pattern. Thread painting will ‘pull up’ your piece depending on how much thread painting you do. Layer the pieces to your background using the cellophane to position them. Do not iron on the brown flower centre at this stage. Be sure to iron them on in the correct order. Cut a piece of light weight interfacing the same size as your background. Pin in place (don’t iron on if using fusible).
7. Audition Threads
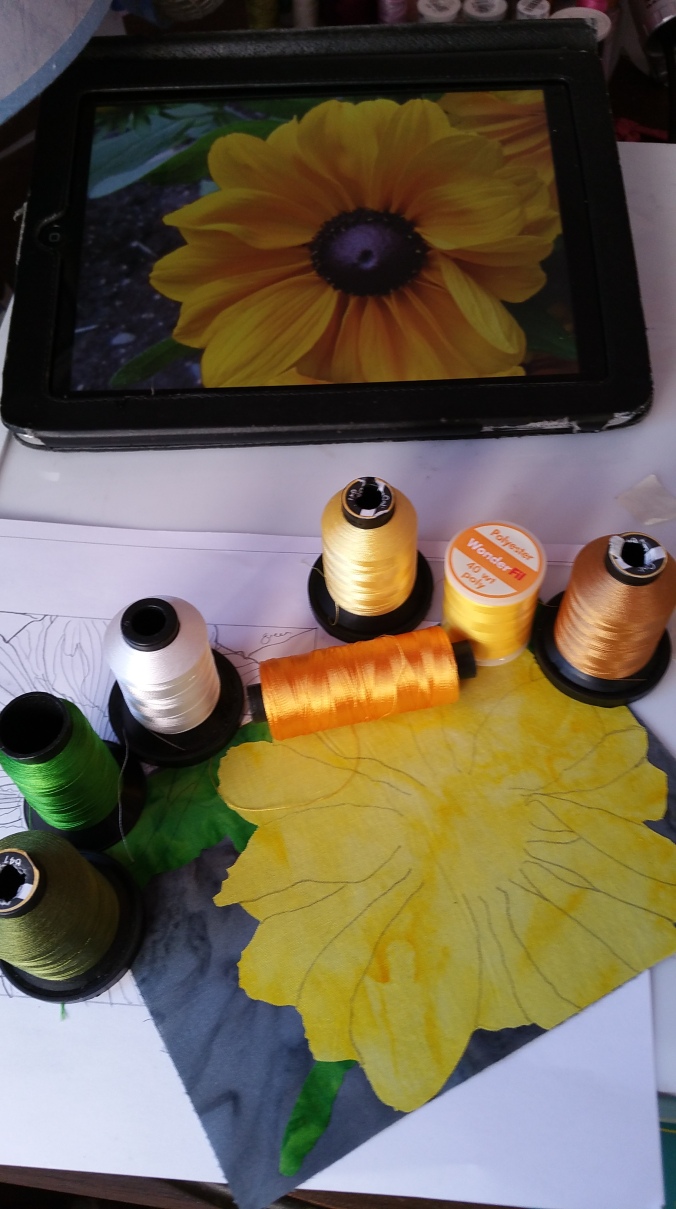
Take a critical look at your photo and decide which threads you are going to use where. Use your paper tracing and soft pencil to sketch the outlines of where each colour will go. Use this as a guide when you are stitching. I have used a textile pen to darken parts of the flower centre prior to stitching.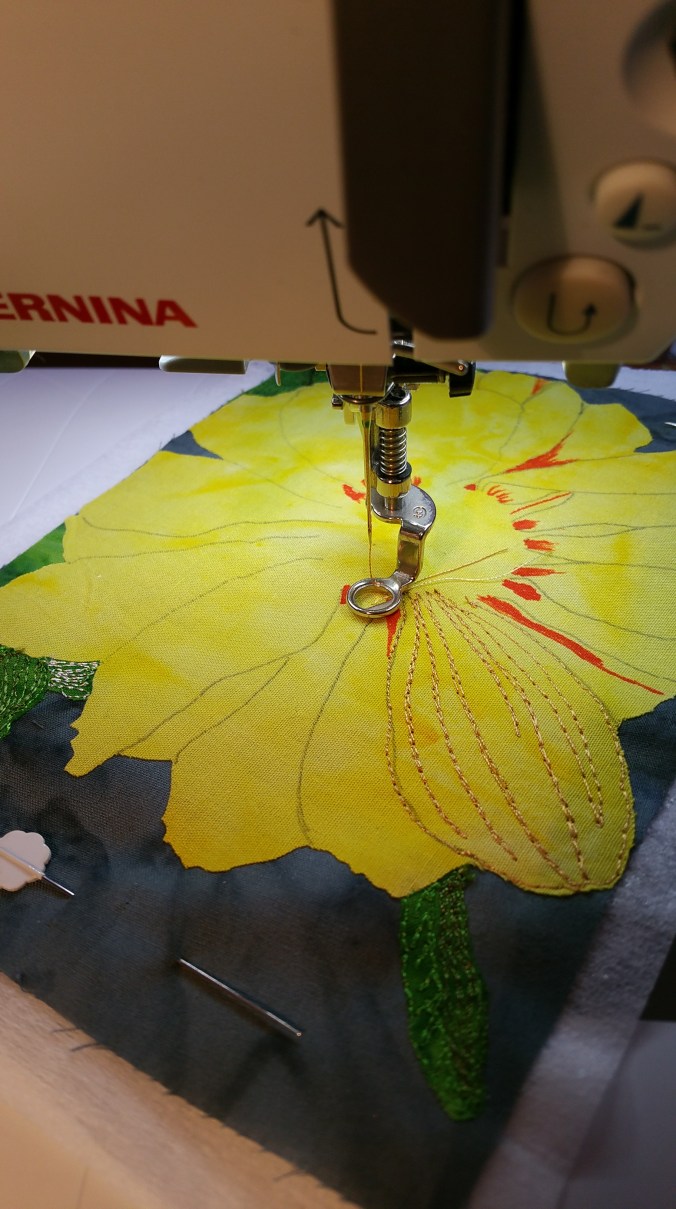
- Begin Thread Painting
Drop your feed dogs and attach a free motion foot to your machine. Tension 0 on top. Similar weight thread top and bottom. Thread the bobbin through the eye on your bobbin case.
Practice on a scrap first. Prepare a piece similar to your quilt top with interfacing at the back to emulate the ‘feel’ of your quilt top. Use your pencil to draw similar shapes so you can practice the technique and test your tension.
Thread sketch over the pencil lines on your flower referring to you photo regularly. Change threads as required to create the shaded effects on the petals. Dark thread for petals in the shade – light thread for the bits that catch the light. There will be puckering, most will disappear when it is quilted. If you are concerned add another piece of interfacing to the back of your work to better stabilise it.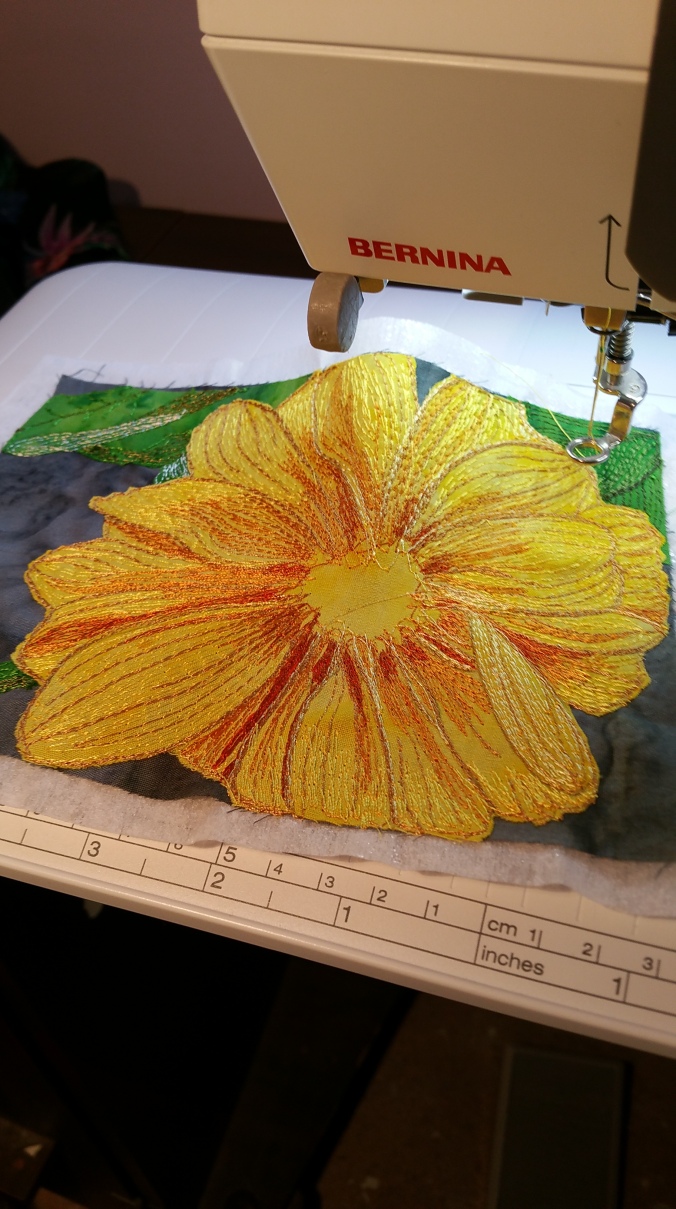
- Flower Centre
Iron on the flower centre. Lightly draw with pencil to define the light and dark areas. I added a little white textile paint to define the lighter area before stitching. Thread paint to match the photo. Add small yellow French knots.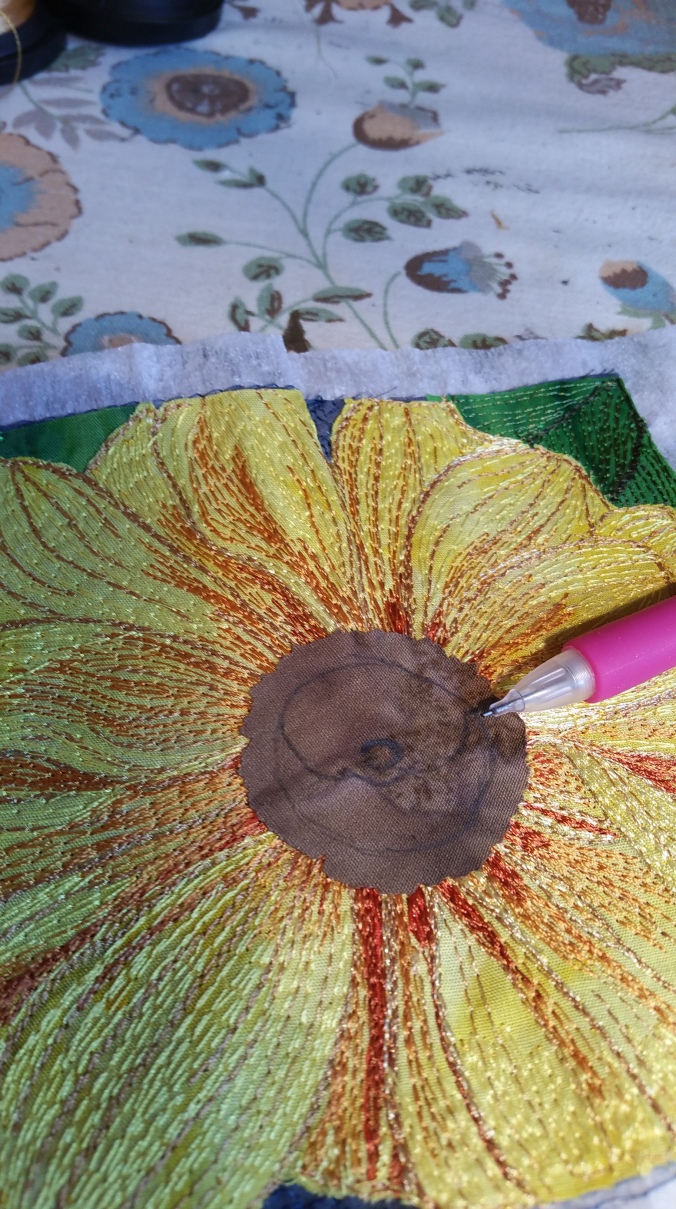
- Prepare the Quilt Sandwich
Layer the top, batting and backing and pin as necessary. Quilt around the petals, centre and leaves. Quilt heavily in the background areas. This will give the flower and leaves more loft. - Finishing Your Quilt
Carefully square off your quilt and finish as preferred. I chose to use a small zigzag with black thread to frame my postcard.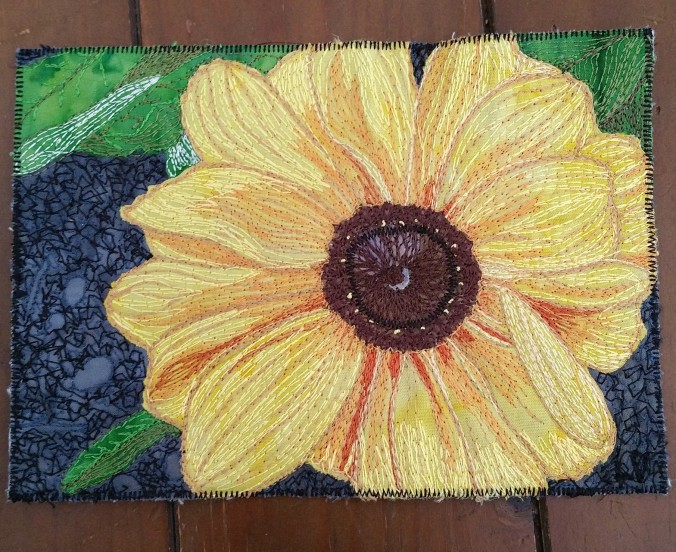
A Place To Start
I’ve been thinking about this blog for some time now and today it happened – one thing led to another and I found myself clicking this button, then that and now I am signed up and ready to go… Kind of scary and exciting all rolled into one!
My plan is to document my crafting journey, to try new techniques, take risks and make mistakes in order to recognise my style.
